Create Your Very First Custom Block in WordPress
In this article we will create a custom block to show the Quote and Author name in the post. We will create the Custom Quote Block using @wordpress/create-block package. This package generates the necessary code and quickly setup the environment to create custom block. In order to use this package we need nodejs installed on our machine. In wordpress every block in the editor is displayed through a React component.
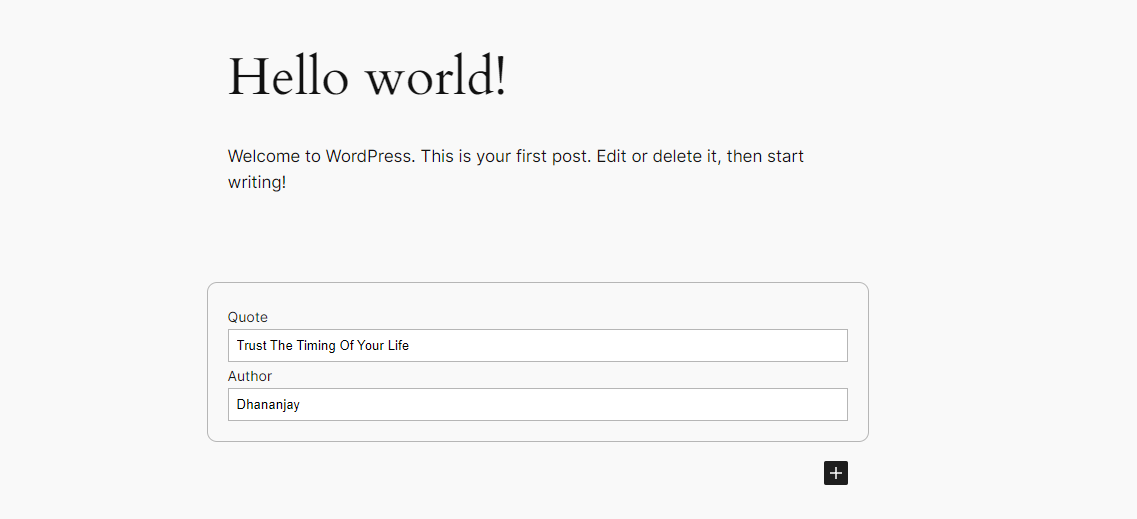
After creating this Quote Block on the post admin will see the two input box to enter Quote and Author name for Quote Block
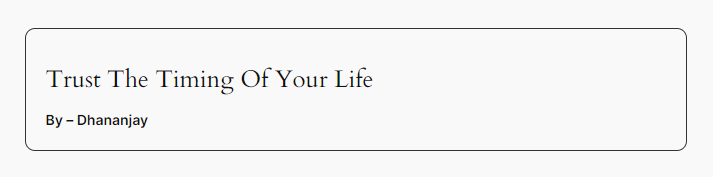
and this is how custom Quote Block is visible to end user
Steps
- Go in the app/public/wp-content/plugins folder in wordpress installation and execute the command
npx @wordpress/create-block@latest custom-quote-block --variant=dynamic - The above command will generate the initial code which is used to create Custom Block
- Then run
cd custom-quote-blockandnpm start
Why we create block in plugins folder?
To ensure they stay available when a theme gets switched.
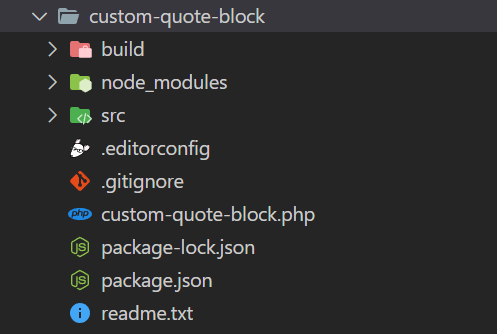
Folder Structure
-
We will see the above file structure of custom-quote-block
php file with plugin nameregister the block on the serverbuildfolder contain optimized production ready build of Blocknode_modulescontains all the necessary dependenciessrccontains all the files that actually used for creating Block (where we write code)src/block.jsoncontain metadata to register blocksrc/index.jswill register block on client sidesrc/edit.jscontain what to render when block in added on the Editorsrc/save.jswill save block structure in database (result of save function will be stored in database in post_content field)src/render.phpwill dynamically render the block
Plugin Activation
- After this we need to activate the plugin from the wp-admin dashboard

Code
- To change the title and description of block we need to edit title and description attributes of
block.jsonfile
// block.json
{
  "title": "Quote Block",
  "category": "widgets",
  "description": "Custom Quote Block."
}
- To add new icon to the Quote Block, we need to it from
index.jsfile here we create component with name Icon and assign it toiconproperty in registerBlockType.
// index.js
import { registerBlockType } from '@wordpress/blocks';

import './style.scss';

import Edit from './edit';
import metadata from './block.json';

// use icon svg (must be of 24px)
const Icon = () => {
  return (
    <svg
      xmlns="http://www.w3.org/2000/svg"
      width="24"
      height="24"
      viewBox="0 0 24 24"
    >
      <path d="M9.983 3v7.391c0 5.704-3.731 9.57-8.983 10.609l-.995-2.151c2.432-.917 3.995-3.638 3.995-5.849h-4v-10h9.983zm14.017 0v7.391c0 5.704-3.748 9.571-9 10.609l-.996-2.151c2.433-.917 3.996-3.638 3.996-5.849h-3.983v-10h9.983z" />
    </svg>
  );
};

registerBlockType(metadata.name, {
  edit: Edit,
  icon: Icon, // add icon like this
});
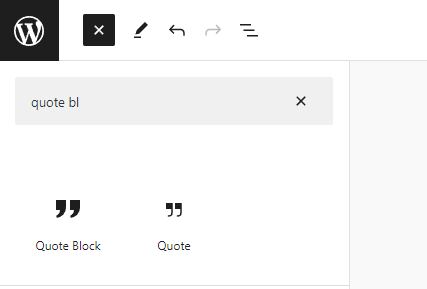
- After this search Quote Block in the Editor of post and Block will appear like this
- The Quote has two fields which are Quote and Author. So in order to store the Quote and Author
attributesproperty inblock.jsonis used. - In block.json we define two property for the same
// block.json
{
	"$schema": "https://schemas.wp.org/trunk/block.json",
	"apiVersion": 3,
	"name": "create-block/custom-quote-block",
	"version": "0.1.0",
	"title": "Quote Block",
	"category": "widgets",
	"description": "Custom Quote Block.",
	"example": {},
	"attributes": {  // ------- Added attributes here -------
		"quote": {
			"type": "string"
		},
		"author": {
			"type": "string"
		}
	},
	"supports": {
		"html": false
	},
	"textdomain": "custom-quote-block",
	"editorScript": "file:./index.js",
	"editorStyle": "file:./index.css",
	"style": "file:./style-index.css",
	"render": "file:./render.php",
	"viewScript": "file:./view.js"
}
Rendering Quote Block Within Editor
edit.jsfile is responsible to control how block will function and appear in the Editor.
// edit.js
import { __ } from '@wordpress/i18n';
import { useBlockProps } from '@wordpress/block-editor';

import './editor.scss';

export default function Edit({ attributes, setAttributes }) {
  const { quote, author } = attributes;

  return (
    <div {...useBlockProps()}>
      <div>
        <label for="quote">Quote</label>
        <input
          id="quote"
          value={quote || ''}
          onChange={(e) => setAttributes({ quote: e.target.value })}
          placeholder="Enter quote"
        />
      </div>
      <div>
        <label for="author">Author</label>
        <input
          id="author"
          value={author || ''}
          onChange={(e) => setAttributes({ author: e.target.value })}
          placeholder="Enter author name"
        />
      </div>
    </div>
  );
}
-
here the
useBlockPropsadd all the css and styles needed by the block editor -
Edit has access to
attributesandsetAttributesprops. Using this we can get and set the attributes defined in block.json -
for input element we have provided value from the attributes and onChange we have set the new value to the attributes using setAttributes so when we save the post the Input typed in the input box is saved.
Rendering Quote Block in Frontend
- After saving the post Quote Block is working properly in the Editor but the default message is still displayed on the frontend (open the link of post and see). For that we need to do some changes in
render.php
<!-- render.php  -->
<div <?php echo get_block_wrapper_attributes(); ?>>
	<h4><?php echo $attributes['quote']; ?></h4>
	<p>By - <?php echo $attributes['author']; ?></p>
</div>
-
In render.php
get_block_wrapper_attributesworks same asuseBlockProps(load all necessary css and styles) -
Here also we have access to the $attributes. So here we show
$attributes['quote']Quote and and$attributes['author']using this.
This is how we can easily create the basic WordPress custom block for Gutenburg Editor